
Outlook
How to setup your Outlook email client to access the mailserver.
|
1 Open Outlook. Under the menu "tools" select "Accounts" |

|
|
2 Enter your name in the new window and push "Next" |

|
|
3 Enter your email (your main email provided by us) in the new window and push "Next" |

|
|
4 Enter the "Incoming server" and "Outgoing server" as specified by us and push "Next" |

|
|
5 Enter your login information. The account name is your login. Push "Next" |

|
|
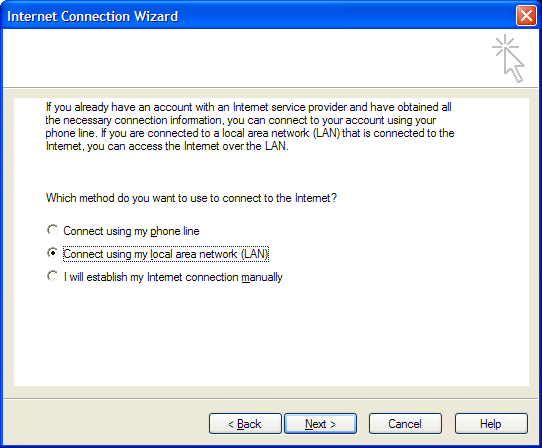
6 In the new window, select the connection you use to access the Internet and push "Next" and "Finish". Now you can connect to the Internet and read your email. A few more steps are needed to be able to send email. |
|
|
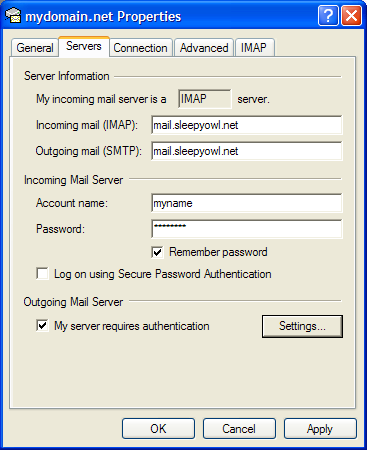
7 Again under the menu "Tools" select the section "Accounts". Click on the newly created account and push the button "Properties". A new window appears, in the "General" tab change the account name to reflet your domain name. Now go to the "Servers" tab. |

|
|
8 In the "Servers" tab, click the box labeled "My server requires authentication". Do NOT select the "Log on using Secure Password Authentication" box, use the SSL encryption under the "Advanced" tab instead. Now go to the "Advanced" tab. |
|
|
9 In the "Advanced" tab, place the "Server Timeouts" cursor to 3 minutes. Push "Apply" and "OK" |

|
Per default Outlook does not copy your sent email in the "Sent" folder on the IMAP server. If you need this normal functionality, here is a link to a Microsoft support bulletin.